
On paper, the cookies fit. Then the insert sample arrives.
The PET cavity walls take up more room than expected. Open paper cups spread beyond the cookie diameter. A folded inner-bag seal pushes against the lid. By that stage, changing the tin means repeating the layout, sample, and packing test.
That is why a cookie tin insert should be selected before the tin dimensions are frozen. The insert is not an accessory added at the end. It affects product protection, piece count, filling speed, opening presentation, and the total cost of the finished pack.
At Jinyu, we've sampled hundreds of cookie tin projects. The ones that proceed smoothly share one habit: the client brought real cookies to the first conversation, not just a target net weight and a rough tin size. This guide is based on what we've learned from those projects — what works, what fails at the sample stage, and where the hidden costs usually sit.
Before comparing materials, define the job.
A cookie tin insert may need to:
Stop cookies sliding into each other
Separate shapes or flavours
Support fragile edges and decorations
Present a repeatable arrangement when the lid opens
Make counting and filling easier
Protect the product from moisture or outside odours
Keep the pack stable through case packing and distribution
Not every insert performs every function. A divider can stop direct contact but does not create a sealed moisture barrier. A bag can provide a barrier but does not automatically stop the cookies moving inside the tin. This distinction is the starting point for a sensible comparison.
| Insert option | Positioning | Moisture barrier | Capacity effect | Packing process | Best suited to | Main limitation |
| Thermoformed PET tray | High when cavities fit correctly | None by itself | Medium to high reduction | Repeatable; can suit manual or automated loading | Fragile, premium or consistently sized cookies | Tooling, cavity fit and plastic use |
| Paper divider | Medium; depends on cell size | None | Low to medium reduction | Often requires folding or assembly | Mixed assortments and flexible compartment layouts | Products can still move inside oversized cells |
| Paper cup | Low to medium | None | Medium reduction because the cup opens wider than the cookie | Usually manual | Gift tins, handmade-style ranges and visible assortments | Labour, inconsistent opening and limited vertical restraint |
| Sealed inner bag | Low unless combined with another insert | Medium to high, depending on film and seal | Variable | Requires filling and reliable sealing | Products needing moisture and aroma protection | Bag inflation, folded seals and limited positioning |
The table is a screening tool, not an approval. The finished choice still needs a sample made around the real cookie.
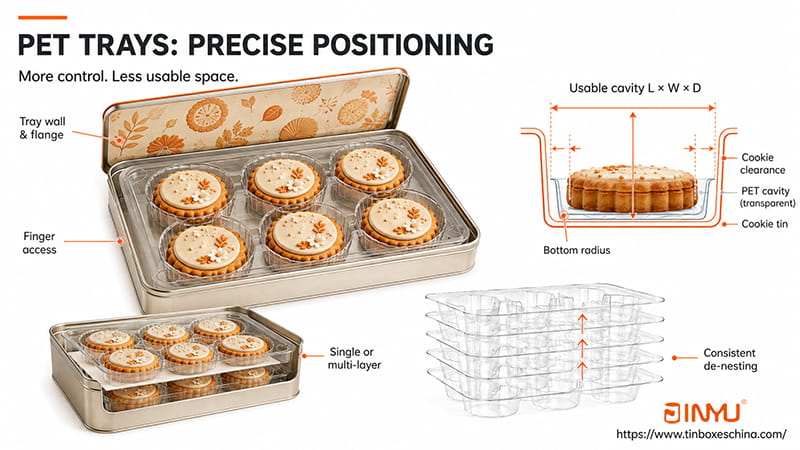
A thermoformed PET tray uses shaped cavities to hold individual cookies or small groups in a repeatable position. It works especially well when the opening arrangement is part of the product value: decorated cookies, premium assortments, and products that must arrive facing the same direction.
The important specification is not simply "PET tray." Check:
The usable cavity length, width, and depth
Clearance around the largest production cookie
The radius at the bottom of the cavity
Tray-wall and flange thickness
Space for fingers to remove the product
Whether trays will be used in one or several layers
Whether stacked empty trays can be separated consistently on the packing line
What we've learned about cavity fit:
Too much clearance allows movement. Too little can mark icing, coatings, or delicate edges. Our standard starting point is 1–1.5 mm lateral clearance per side for a plain biscuit edge. For cookies with piped icing, sugar decorations, or chocolate drizzle, we add at least 3 mm of vertical clearance above the highest point of the decoration.
We sampled a project last year where the client had specified the cavity depth based on the biscuit's base thickness only. The piped icing on top — roughly 2.5 mm high — wasn't accounted for. When the loaded trays were stacked, the tray above pressed directly onto the icing and marked nearly every piece. We deepened the cavities by 3.5 mm and the problem disappeared.
PET trays normally involve a higher development commitment than a basic paper divider, particularly when a new forming tool is required. In return, they can give a more controlled pack-out and reduce variation between operators.
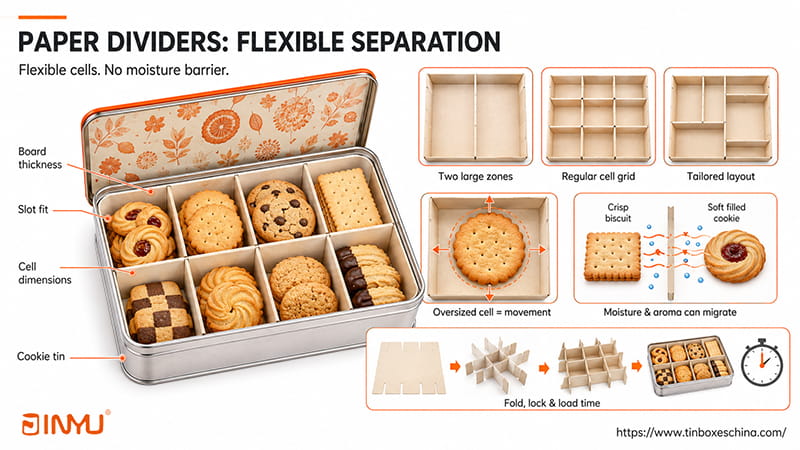
Paperboard dividers can create two large zones, a regular cell grid, or an arrangement tailored to several cookie shapes. Tooling is usually simpler than a formed plastic tray, and dimensions can often be adjusted more easily during development.
They are useful when the goal is to organise an assortment rather than lock every piece into a shaped cavity. However, divider performance depends on board thickness, slot fit, cell dimensions, and assembly accuracy.
The mistake we see most often: The divider is designed around the cookie's nominal diameter, leaving no allowance for production variation. If a 60 mm cookie sits inside a 68 mm cell, the divider has separated it from the next flavour but has not controlled movement. After transport, cookies shift within their cells, edges chip, and the opening presentation looks untidy.
We recommend specifying cell dimensions based on the largest cookie from a real production batch, not the average size. Add no more than 2–3 mm clearance per side. If the cell is larger than that, the divider is doing organisation work but not positioning work.
A divider also does not prevent moisture or aroma migration. Crisp biscuits and soft filled cookies will continue exchanging moisture even when a paper divider sits between them. For mixed-texture assortments, separate sealed packs are the only reliable solution.
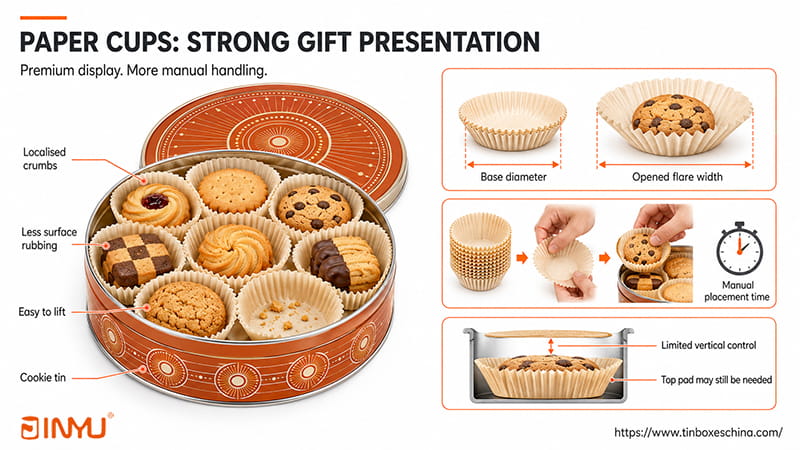
Paper cups give a cookie assortment a familiar confectionery or handmade-bakery appearance. They keep crumbs more localised, reduce some surface rubbing, and make individual pieces easier to lift from the tin.
Their space requirement is easy to underestimate. A cup selected by its base diameter may flare considerably when opened. The usable width inside the tin must accommodate that opened shape, not the flat cup supplied in a sleeve.
We learned this the hard way on a gift tin project. The client selected cups based on an 80 mm flat diameter and planned for a 180 mm round tin. When the cups were opened during sampling, the top diameter reached approximately 105 mm — far too wide for the planned arrangement. We had two options: move up to a 200 mm tin or switch to a shallower cup profile. The client chose the larger tin, which then required a bigger carton and increased freight volume.
Our current practice is to measure the cup in its opened position before calculating tin capacity. We also recommend a loading trial with the actual operators who will do the packing — not just the packaging engineer.
Paper cups are most convincing when presentation matters more than maximum piece count. They are less suitable when the line must place hundreds of cups quickly unless a reliable feeding method is available. They also offer little vertical control, so a pad, divider, or bag may still be needed for transport.
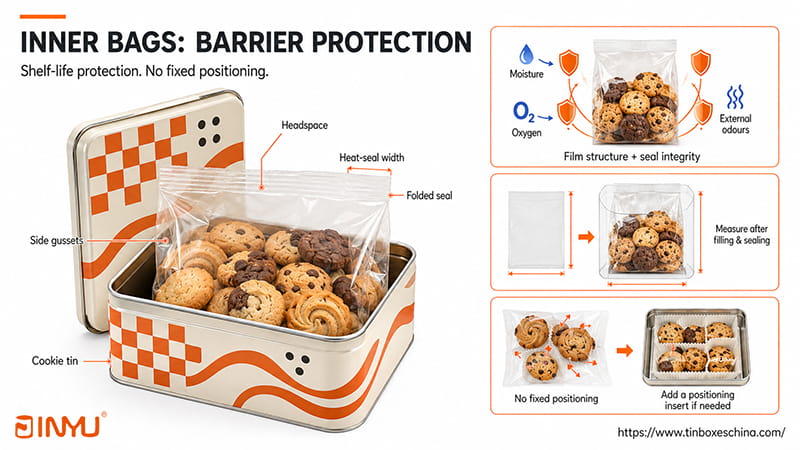
An inner bag performs a different job from a tray or divider. Its main value is product containment and protection against moisture, oxygen, or external odours, depending on the film structure and sealing process.
For sizing, assess the bag after filling and sealing — not when it is empty. Check the side gussets, headspace, folded seal, heat-seal width, and the way the bag settles inside the tin. A bag that fits when empty may become too tall once it contains the full cookie count.
We had a project where the client sized their bag using a flat, empty sample. Once filled with 24 shortbread fingers and heat-sealed, the folded top seal added 8 mm of height the tin couldn't accommodate. The lid wouldn't close without pressing against the seal. The fix was to reduce the bag height by 10 mm and run a sealing trial with the actual fill quantity before re-cutting the bag spec.
A loose inner bag rarely controls presentation by itself. If the cookies must stay in individual positions, combine the bag with a tray, divider, cup, or layer pad.
A brand came to us with 12 decorated cookies packed in a rectangular tin for parcel delivery. They had planned a paper cell divider — it gave the correct count and kept the rows organised.
We ran a shake test with the final divider and tin. At every drop height, cookies lifted within their cells and struck the lid. Edge damage was visible on more than half the pieces after one simulated delivery cycle.
The revised solution used two shallow PET trays instead. The trays provided both horizontal and vertical control. The trade-off was that the tray flanges and cavity walls reduced usable space, so we had to increase the tin height by 5 mm. A sealed outer bag around each loaded tray set was added for shelf-life protection.
The key lesson: the distribution route and product fragility determined the insert choice. Paper cells were not "wrong" in principle — they were wrong for this specific combination of product and shipping conditions.
An 18-piece round gift tin contained crisp butter biscuits, filled cookies, and three flavours. The client wanted paper cups for presentation, with a simple divider to keep flavour groups organised.
That arrangement solved presentation, but not moisture migration. The soft filled cookies shared the same unsealed space as the crisp biscuits. During a four-week ambient storage test, the crisp biscuits softened noticeably, and the filled cookies began to harden.
The revised concept kept the paper cups for presentation but introduced individually flow-wrapped filled cookies. This meant the moisture transfer between textures was controlled, while the cups still provided the handmade-bakery look the client wanted.
The lesson we've taken from projects like this: the best insert is often a combination. One component controls movement and presentation. Another protects product quality. Rarely does a single insert do both.
Every insert consumes space:
PET uses cavity walls, flanges, and radiused corners
Dividers add board thickness between cells
Paper cups extend beyond the cookie edge
Bags add gussets, headspace, and folded seals
Individual flow wraps add seams around every product
Capacity should therefore be calculated using the finished insert and the usable internal dimensions of the tin — not the empty container.
A useful starting point: If your paper cup opens to 105 mm and you planned for 80 mm, your capacity calculation is already wrong. If your PET tray adds 4 mm of flange thickness per layer and you planned two layers, that's 8 mm of vertical space you didn't account for. These numbers are small in isolation, but they determine whether the lid closes cleanly or presses against the product.
The cheapest component does not always create the lowest-cost pack.
Use a broader calculation:
Total packed cost = insert cost + tooling allocation + assembly labour + additional tin and freight cost + expected breakage loss
A paper divider may have a low unit price but require more hand assembly. A PET tray may involve tooling but improve placement consistency. Paper cups may strengthen gift presentation while reducing packing speed. An inflated bag may force the project into a taller tin and larger export carton.
We've seen clients choose a cheaper insert on paper and then spend more on labour and breakage than they saved on components. Before deciding, run a timed packing trial with real operators and compare the completed carton configuration — not just the component invoice.
| Product or channel | Main risk | Recommended starting option | Possible secondary protection |
| Fragile decorated cookies | Edge damage and contact with the lid | Fitted PET tray | Sealed bag or top pad |
| Traditional butter cookies | Rubbing, crumbs, vertical movement | Layer pads or paper cups | Complete inner bag |
| Mixed-flavour gift assortment | Movement, presentation, flavour mixing | Divider plus paper cups | Separately sealed groups |
| Soft or filled cookies | Moisture and aroma transfer | Barrier inner bag or individual wrap | Divider for presentation |
| Sandwich biscuits | Edge chipping and stack movement | PET tray or close-fitting divider | Inner bag |
| Hospitality portions | Hygiene and portion control | Individual flow wrap | Divider or tray for count control |
| E-commerce and export packs | Repeated shock and vibration | Fitted tray or close cell divider | Bag, top pad, tested shipping carton |
An insert can look excellent in a design review and still create trouble at production speed.
For manual filling, check whether operators can open cups, assemble dividers, and remove products without forcing them. For automated or semi-automated loading, check tray nesting, de-nesting, static, orientation, and dimensional consistency. For inner bags, define whether the line uses pre-made bags or roll-fed film and how the seal will be inspected.
A ten-second difference per tin may appear small during sampling. Across a 50,000-piece production run, that's nearly 140 hours of additional labour. We always recommend timing the real assembly process before committing to an insert type.
"Paper" and "plastic" are not complete specifications. Request documentation for every material that may contact the food, including resin, paperboard, inks, coatings, adhesives, and bag-seal layers. Requirements should match the destination market and the actual contact conditions.
Sustainability also needs a complete-pack view. Paper may reduce visible plastic, but coatings or laminations can affect recycling. PET may be recyclable in some markets, but collection systems and local acceptance vary. A lighter insert that fails to protect the food can also increase product waste.
Paperboard or moulded-fibre trays may be worth testing where a brand wants to reduce plastic, but they must still meet the required dimensional accuracy, grease resistance, packing speed, and transport protection.
These are the errors we've seen most often on real projects:
Finalising the tin before the insert. The insert determines usable space. Pick it first.
Calling every paper component a moisture barrier. It isn't.
Comparing unit prices without assembly labour. Run a timed trial.
Designing a PET cavity around one perfect cookie. Use the largest cookie from a real production batch.
Measuring a paper cup before it is opened. Always measure in the open position.
Ignoring the filled bag's gussets and seal folds. Size bags after filling and sealing.
Assuming more empty space means better protection. Too much space causes movement, not safety.
Testing the tin without its final shipping carton. The carton is part of the protection system.
Making an environmental claim without checking coatings and local recycling. Be specific, not generic.
Before approving mass production:
Use cookies from a representative production batch
Include the largest realistic cookie dimensions and decoration height
Pack the planned count using the final insert components
Confirm that the lid closes without pressing the top layer
Time the real assembly and filling process
Check product removal and opening presentation
Run shake, drop, and distribution tests in the final shipping carton
Verify bag seals and shelf-life performance where applicable
Re-test after changing the cookie, count, insert, tin, or sales channel
A fitted PET tray is often the first option to test because it can control the position of each cookie. It is not automatically the final answer. The cavity must allow for product variation without pressing delicate edges or decoration, and the completed pack still needs transport testing.
They keep products in separate physical compartments, but an open paper divider does not stop moisture or aroma migration. Products with different textures or strong flavours may need separate sealed packs.
They can be when the resin, manufacturing process, and documentation meet the applicable food-contact requirements. Do not approve a tray from appearance or a generic "food-grade" statement alone.
Usually, yes. Tray walls, paper cells, cup flares, bags, and wrapper seams all use space. The reduction varies by design, so calculate with the finished insert rather than the empty tin.
They often require less tooling, but total cost depends on cup quality, order volume, packing labour, production speed, and the size of tin required. Compare the finished packed cost, not only the insert price.
Sometimes. Paper-based formed trays may suit products that need moderate positioning and a reduced-plastic packaging story. They still need testing for fit, strength, grease resistance, line speed, and distribution performance.
Often, yes. The bag can protect moisture and aroma, while the tray or divider controls position and presentation. The correct combination depends on cookie fragility, shelf life, filling process, and sales channel.
The right cookie tin insert is not simply the cheapest component or the material with the strongest sustainability claim. It is the option — or combination — that gives your product the required protection, presentation, and packing efficiency without forcing the brand into an unnecessarily large tin.
Start with production-representative cookies. Define the count, shelf life, sales channel, and opening presentation. Compare insert concepts inside the usable internal dimensions, then approve the pack through physical testing.
Jinyu produces custom cookie tins and biscuit boxes for brands, importers, and packaging distributors. We can help you evaluate insert options against your actual cookie dimensions, recommend suitable tin structures from our existing mould library, and prepare a sampling plan before the tin size is frozen.
Send us your baked cookie dimensions, required piece count, proposed inner packaging, destination market, and sales channel. We'll compare the pack-out with available moulds and provide a digital mockup — typically within 48 hours.
Custom printed production normally starts at 5,000 pieces. Sampling takes approximately 7–10 days, followed by 25–35 days for mass production after approval.

Holen Sie sich die neuesten Informationen und Sonderangebote


 IPv6-Netzwerk unterstützt
 Deutsch
 English
 Français
 Español
 Português